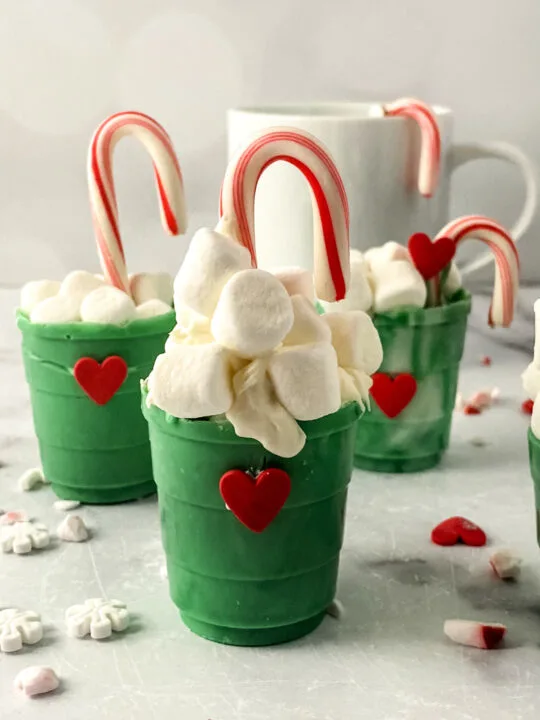
A Grinch bomb cup is a chocolate cup filled with marshmallows, peppermint sticks, and sprinkles made from melted chocolate. To make a steamy mug of hot chocolate, drop them in a cup of hot milk and stir to release the marshmallows.
With these bomb cups, you can get your Christmas into high gear, and also for those colder nights, you can’t go wrong with a hot drink.

This hot beverage will keep you warm even in the winter. There’s no need to buy store-bought bomb cups when you can make your own.
Why You’ll Love This Grinch Bomb Cup
- Fun and exciting way to have and share on holidays.
- The ingredients are easy to find.
- The recipe is easy to follow.
Christmas is a time for family, friends, and lots of delicious food. This year, why not add a little bit of fun to your Christmas feast with this Grinch Bomb Cup recipe?
These green cups are packed with flavor and will be sure to bring a smile to everyone’s face.
So gather your friends and family around the table and get ready for some holiday cheer!

Equipment Needed to Make Grinch Bomb Cup

- Parchment Paper
- 2 Oz Disposable Cups
- Xacto Knife
- Piping Bag
- Scissors
- Cutting Board
- Small Microwaveable Bowls
Yield – 1 Cup
Ingredients for Your Grinch Bomb Cup
- Green Melting Wafers
- White Almond Bark, Melting Wafers or Candy Melts
- Mini Marshmallows
- Holiday Sprinkles, Optional
How To Make A Grinch Bomb Cup
Step 1: Melt Chocolates
First off, meltdown chocolates in small microwaveable bowls according to package instructions and make sure to do not over melt them as they have the tendency to burn easily.
Stirring in a 30-seconds interval is recommended so that melting wafers are fully melted.
If you need to thin out the green melting wafers, better to add a small amount of coconut oil until it reaches a pourable consistency.
Step 2: Molding and Marbling the Cup

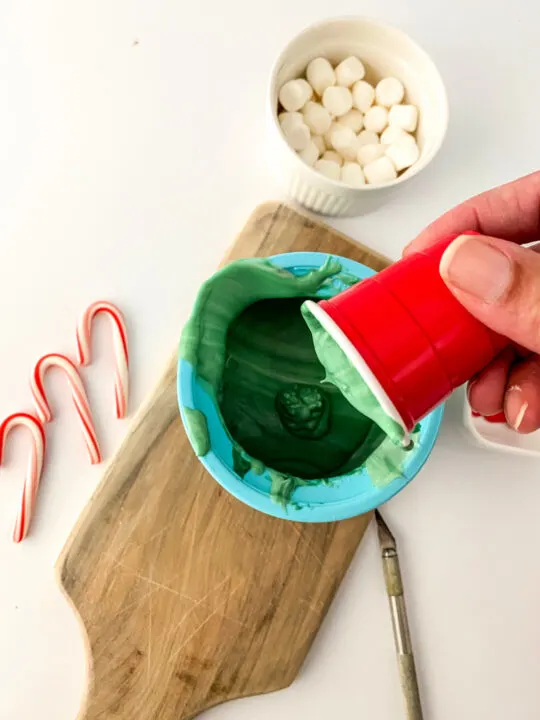
Place the plastic cups in an upside-down position onto a cutting board, and using a Xacto knife, carefully cut a line down the cup.
Have the white and green melted wafers marbled in the same bowl, do this by carefully pouring both of them, kindly stir until it is fully incorporated.

Once the chocolate formed a marble-like appearance, carefully pour the chocolate into the cups.

Make sure to twist the cup as you pour the chocolate, ensuring that the entire thing is coated.

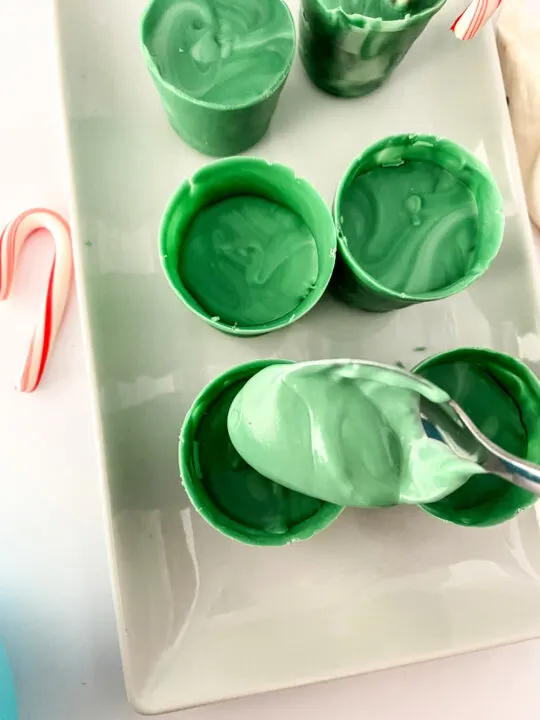
Place and turn the cup upside down in a piece of parchment paper. This will allow any excess or extra chocolate to drip off and cover the entire fullness of the cup.
Step 3: Freeze It On
Once all the cup molds are laid out in the parchment paper, it is now time to freeze it.
Place all the cups in the freezer for about 7 to 9 minutes.
This will make sure that the molds have now been set. After such a period, carefully remove it from the freezer.
Add more melted chocolate on top of that filling it 3/4 full, then return to freezer to harden for 18-25 minutes.
Step 4: Peel it Off and Décor Time

Remove again from the freezer and turn the cup upside down on the cutting board and make cuts in the rim and around it.
Carefully peel the cup off starting at the original slit on the side. Once peeled, set it aside for toppings.

Make sure the bomb cup is turned right side up, then add a small amount of melted chocolate to the top.
Add mini marshmallows, peppermint sticks, and sprinkles.

You may use a piping bag to put on sprinkles and additional marshmallows.
Then, return to the freezer for a final set, for about 7-8 minutes.

In this step, you may also opt to create cups with hot chocolate. Instead of filling the cavity up with chocolate, add 1 tablespoon of cocoa powder and then fill it 3/4 full with melted chocolate.
Once filled up, return to the freezer for 15 minutes.
Step 5: Serve and Enjoy

Once the bomb cups are fully set and hardened, you may now serve them with hot milk.
Place the bomb cups on the bottom of the mug as you pour the hot milk over it.
When the chocolates are fully melted, stir and enjoy your drink!

What to Serve with Your Grinch Bomb Cup
Sides
These bomb cups are perfect for any pastry or savory dish.
The sweetness of these bomb cups as they have been combined with hot milk is a great complement to balance out the savory dish.
Desserts
These are the perfect dessert as they give off the ultimate sweetness.
Perfect for holidays and cold weather, these bomb cups are definitely a sure win to those with a sweet tooth.
Drinks
These Grinch bomb cups are perfect to have over the holidays, especially those with filled hot chocolate or cocoa powder.

Popular Substitutions & Additions
In making these Grinch bomb cups, you may use other types of wafers, especially those with nuts or even almond bark.
You can use the store-bought mold as well in creating the cup.
Also, you may tweak the flavor by incorporating flavors like coffee, peppermint, and even pumpkins spice.
How Store Grinch Bomb Cup
Best Way To Store Grinch Bomb Cup Leftover
Individually bag the Grinch bomb cups or divide them into little muffin tins.
If they are all in the same bag, they are more likely to stick together.

How Long Will Grinch Bomb Cups Last In the Fridge?
If stored at room temperature for up to 2 months, bomb cups packed with the hot cocoa mix will keep fresh and even those without the cocoa powder or mix.
Can I Freeze Grinch Bomb Cups
Hot chocolate bombs can be frozen, however, they must be wrapped and stored properly.
It is recommended to wrap in two layers of plastic wrap and foil, then put them in a freezer-safe glass jar.
They will last around 6 months if stored in this manner.

FAQs
Is 1 teaspoon of hot cocoa mix sufficient?
No, to produce a cup of hot chocolate, most hot chocolate mixes recommend using about 2 tablespoons of hot chocolate mix.
Only roughly half of that is present in these bomb cups.
Although it is less than the recommended amount, the extra chocolate produced when the Grinch bomb cups melt compensates for the lack of hot chocolate mix.
You may certainly stir a little extra mix into the drink after the bomb cups have melted if you think they need it.)
Is it possible to use these without the milk?
Yes, the Grinch bomb cups can be used with hot water.
The finished product will not be as rich and creamy as one produced with milk.
Can I fix the cracks when unmolding?
Yes, if it is just the top of it that breaks, you can hide it by simply smoothing it out by adding more melted chocolate and topping it with marshmallows.

Is it necessary to keep hot chocolate bombs chilled?
No, a bomb cup is room temperature and does not need to be refrigerated. However, you may freeze it to prolong its shelf life.
Can I make This Grinch Bomb Cup ahead of time?
Yes, bomb cups can be prepared up to two months ahead of time.
Simply store them at room temperature in an airtight container.
Other Hot Chocolate Bomb Recipes You’ll Love
Aside from Grinch bomb cups, you may try these fun and exciting recipes below:
If you’re looking for a way to make your hot chocolate extra fun this holiday season, we think the Grinch bomb cup is just perfect.
All it takes is some marshmallows, peppermint sticks, and sprinkles made from melted chocolate to create one of these cute treats!

WHAT’S NEXT?
Do not forget to come back and let me know your thoughts and experience on how your Grinch Bomb Cups turned out!
Grinch Bomb Cup Recipe
Grinch Bomb Cup Recipe

A Grinch bomb cup is a chocolate cup filled with marshmallows, peppermint sticks, and sprinkles made from melted chocolate. To make a steamy mug of hot chocolate, drop them in a cup of hot milk and stir to release the marshmallows.
Ingredients
- 2 oz green melting wafers
- 1 oz White almond bark, melting wafers or candy melts
- 7-10 mini marshmallows
- holiday sprinkles, optional
Instructions
- Melt down chocolates according to package instructions, do not over melt they can burn. If you need to thin out the green melts add a small amount of coconut oil until it’s a pourable consistency.
- Place the plastic cups upside down on a cutting board and using the xacto knife cut a line down the of the cup.
- Marble the white and green by pouring them into the same bowl but down fully
- stir to incorporate.
- Pour the marbled chocolate into the cups.
- Twist the cup as you do this (to fully cover the entire thing).
- Turn the cup upside down on a piece of parchment to allow any extra chocolate to drip off and cover the fullness of the cup
- Place the cup in the freezer for 7-9 mins to set.
- Remove from the freezer.
- Add more melted chocolate on top of that filling it 3/4 full
- Return to freezer to harden for 18-25 mins
- Turn the cup upside down on your cutting board and make cuts in the rim of the cup all the way around it.
- Carefully, peel off the cup, starting at the original long slit on the side.
- Once the chocolate is released from the cup turn it right side up.
- Add a small amount of melted chocolate to the top, add mini marshmallows, peppermint sticks, and sprinkles.
- Use melted white chocolate in a piping bag to "glue" on sprinkles and additional marshmallows.
- Return to the freezer for a final set, for about 7-8 mins
Notes
Option to create cups with hot chocolate.
- Instead of filling the cavity up with chocolate add 1 tbsp cocoa powder and then fill it 3/4 full with melted chocolate. Return to freezer for 15 mins.
- Then turn the cup upside down on your cutting board and make cuts in the rim of the cup all the way around it.
- Carefully, peel off the cup, starting at the original long slit on the side.
- Once the chocolate is released from the cup turn it right side up.
- Add a small amount of melted chocolate to the top, add mini marshmallows, peppermint sticks, and sprinkles.
- Use melted white chocolate in a piping bag to "glue" on sprinkles and additional marshmallows.
- Return to the freezer for a final set, for about 7-8 mins
Troubleshooting Guide
It cracks when unmolding:
If just the top of it breaks you can hide it, smooth it out, add more melted chocolate, and top with marshmallows.
The shell breaks completely no way to save it? Melting it back down and try again.
This had about a 90% success rate.
The more you do the better they are.
Depending on your chocolate medium (melting wafers, candy melts, or almond bark) some cups will be thicker than others and more sturdy.
Nutrition Information:
Yield:
1Serving Size:
1Amount Per Serving: Calories: 844Total Fat: 31gSaturated Fat: 6gTrans Fat: 0gUnsaturated Fat: 23gCholesterol: 1mgSodium: 550mgCarbohydrates: 137gFiber: 4gSugar: 76gProtein: 11g
Nutritional information is automatically calculated with ingredients and serving size and may not be accurate. Please always double check with your own nutritional apps as well.