Looking for a fun and easy way to decorate for Halloween? Try this Dollar Store canvas jack-o-lantern craft! It’s simple to make and doesn’t require any special skills or tools. Plus, you can customize it to fit your own personal style. So gather up some supplies and get started today!

The Dollar Store Canvas Jack-O-Lantern Craft is not only a fun and creative way to decorate for Halloween, but it also helps you save money!
The best part about this craft is that it uses items from the dollar store, so you don’t have to spend a lot of money on supplies.
This craft is also great for kids because it’s easy for them to do on their own, so you don’t have to worry about them getting bored during the process.
Why You’ll Love Dollar Store Canvas Jack-O-Lantern Craft
If you’re looking for a fun and easy Halloween craft, look no further than the dollar store canvas jack-o-lantern!
This project is perfect for beginners, as it requires no special skills or pricey materials.
Simply grab a canvas, some paints, and a few other supplies from your local dollar store, and you’ll be all set.
Not to mention, this project is incredibly affordable – another plus for those on a budget.
The best part? The finished product is sure to impress your friends and family.
So go ahead and give it a try – we guarantee you’ll love it!

Materials For Dollar Store Canvas Jack-O-Lantern Craft

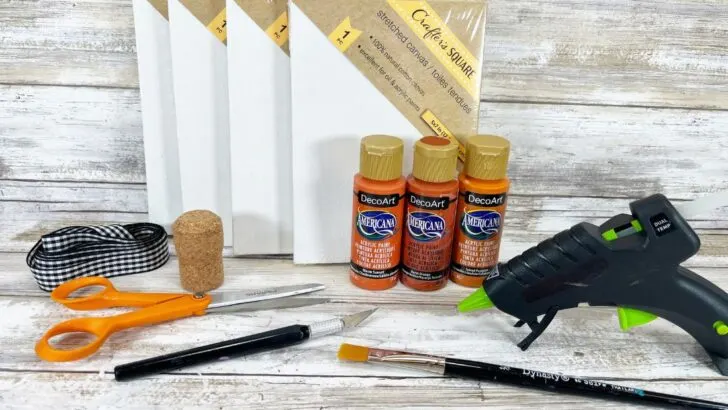
Materials:
- Art Canvas, Four–Dollar Store
- Wooden Craft Stick, One–Dollar Store
- Glue Gun and Glue Sticks – Dollar Store
- Twinkle Lights, White – Dollar Store
- Batteries – Dollar Store
- Acrylic Craft Paint – Bright Orange, Medium Orange, Dark Orange
- A scrap of Felt – Olive Green
- Recycled Champagne Cork
- A scrap of Cardboard
- Vellum Paper
- Wired Twine
- Craft Knife
- Self-Healing Mat
- Scissors
- Wire Cutters
- Pencil
- JACK-O-LANTERN PATTERNS
- Leaf Patterns
How To Make Dollar Store Canvas Dollar Store Canvas Jack-O-Lantern Craft
STEP ONE

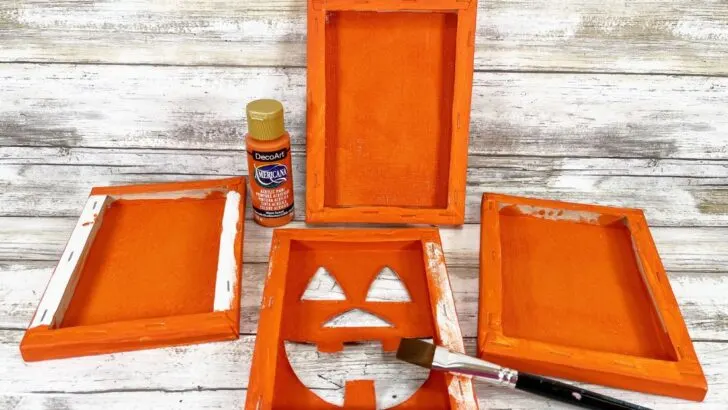
Basecoat all four art canvases with medium orange acrylic craft paint.

While still wet, add in strokes of dark orange and light orange acrylic craft paint.

Blend until you are pleased with the color variations.
STEP TWO

Download and print the JACK-O-LANTERN PATTERNS, and then cut them out with scissors.
Flip over one canvas and trace the Jack-O-Lantern features with a pencil.

Place the canvas on a self-healing mat and carefully cut out the Jack-O-Lantern features with a craft knife.
STEP THREE

Basecoat the backside and edges of the four canvases with medium orange acrylic craft paint.
Trim a wooden craft stick in three pieces with scissors and attach it to the back of the Jack-O-Lantern teeth with a glue gun and glue sticks.
STEP FOUR

Attach the canvases together in a rectangle using a glue gun and glue sticks.

Gluing a canvas to the right and left side.

Secure the back canvas to the first three with a glue gun and glue sticks to complete the rectangle.
STEP FIVE

Measure and cut a piece of scrap cardboard to fit the bottom of the lantern.

Basecoat the cardboard with medium orange acrylic craft paint.
With the orange side up, attach the cardboard to the base of the lantern with a glue gun and glue sticks.
STEP SIX

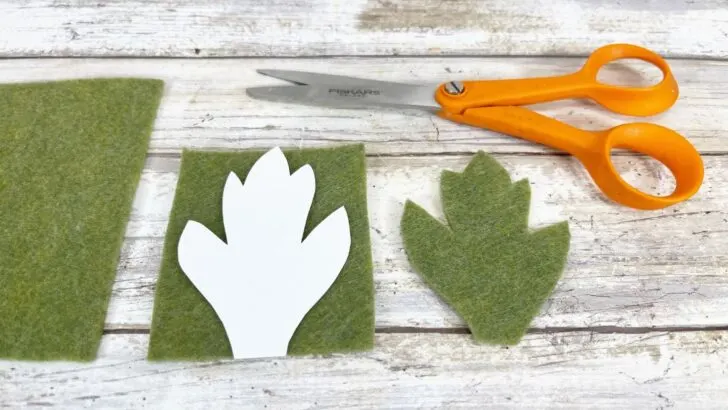
Download and print the LEAF PATTERN, layer it onto a scrap of olive green craft felt, and cut out two with scissors.
To create dimension, apply a dot of glue at the base of each leaf and fold it in half.
Measure and cut two 12” lengths of wired twine using wire cutters.

Wrap around a pencil, and then slide off to create a vine. Stretch and bend the wire to create a pumpkin vine.
Attach a champagne cork to the front center of the canvas with a glue gun and glue sticks.
Hold in place until the glue dries completely.

Glue the wired twine vines and the leaves to the sides of the cork stem.
STEP SEVEN
Measure and cut a piece of vellum paper 4” by 6” and place it inside the lantern behind the Jack-O-Lantern features.
Place batteries in a strand of twinkle lights and place them inside the lantern.
The vellum gives the lantern a soft glow.

What to Use with Your Jack-O-Lantern Craft
Paper plate: If you’re going to make a jack-o’-lantern out of paper, it helps if you use a sturdy base like a paper plate. This way, your jack-o’-lantern will stand up on its own when it’s finished!
Tape: Don’t forget to tape down the edges of your paper, so they don’t get messed up while you work on it!
Scissors: You’ll need scissors to cut out the shapes for your jack-o’-lantern and tape them together into one big piece.
Glue: Use glue to stick everything together once it’s all cut out and taped together!
Popular Substitutions & Additions
- Pumpkins! Not only do they look great with your Jack-O-Lantern craft, but they also make a great background for photos. Plus, if you’re planning on eating them after the holiday, well… then this is a win-win situation for everyone involved.
- Candles and other glowsticks! Jack O’ Lanterns are supposed to be scary, right? So why not scare everyone at the table by lighting some candles or glow sticks?
- Candy – Who doesn’t love candy? It’s a surefire way to add some sweetness and sugar to your jack-o-lantern. You could fill it with wrapped candies or mix it up with some chocolate bars and cookies.

How To Store The Canvas Jack-O-Lantern Craft
Best Way To Store Jack-O-Lantern Craft
Now that you’ve made your jack-o’-lantern craft, it’s time to store it!
There are a few different ways you can keep your craft safe.
One of the easiest options is to simply keep it in an airtight container.
You’ll want one that’s big enough for the whole pumpkin but not so big that it takes up too much room on your shelf.
Another option is to use a Ziploc bag and put some newspaper or tissue paper in there before you put your craft inside.
The newspaper will absorb any excess moisture from the pumpkin and prevent mold from forming during storage.
If you want something more long-term, then consider using a styrofoam block with a lid or even just a cardboard box.
The styrofoam will keep out excess moisture and protect against bugs while allowing airflow through the holes in the top of the block/box.

How Long Will Jack-O-Lantern Craft Last?
Jack-O-Lanterns are a classic Halloween decoration, but their appeal doesn’t end when the holiday does.
You can keep your Jack-O-Lanterns around year-round as a way to bring some Halloween flair into your home throughout the entire year.
If you want to keep your Jack-O-Lantern around for a long time, you’ll need to make sure that it’s properly cared for.
Storing Your Jack-O-Lantern Craft
Once you’re done with your jack-o-lantern craft, you’ll want to make sure it’s properly stored.
You can’t just leave it out in the open—it will get damaged by weather or critters. Instead, you need to put your jack-o-lantern into a box or some other container that will keep it safe from moisture and bugs.
If you don’t have a box handy, simply wrapping it in a newspaper will work fine.
If your jack-o-lantern is made of paper mache or cardboard, you can store it in an airtight container for as long as possible.
If there are any loose pieces that might fall off over time (like leaves), wrap them in small pieces of newspaper first before storing them inside the container with your pumpkin!

Dollar Store Canvas Jack-O-Lantern Craft FAQs
Is it easy to make?
Yes! This craft is one of the easiest you’ll find.
What is Dollar Store Canvas Jack-O-Lantern Craft?
The Dollar Store Canvas Jack-O-Lantern Craft is a Halloween craft that you can make for your home.
This craft uses a canvas and paints to create a jack-o-lantern design on the canvas.
This is an easy craft that can be completed in the afternoon, making it perfect for kids.
Is there anything I should know before I make it?
Yes! If you’re making a Jack-O-Lantern Craft, be sure to follow all safety precautions.
Make sure to use only crafting materials that are intended for children’s use.
Also, if you have an older child who is interested in learning how to carve a pumpkin, it’s best to supervise them while they work.
This will ensure that they do not cut themselves on any of the knife blades.
Can I make these ahead of time?
You can make the Jack-O-Lantern crafts ahead of time, but we do recommend that you wait until the day before Halloween to assemble them.
The reason is that they may not be as easy to hold together once they’re made with glue.

Other Crafts You’ll Love
- Pumpkin Mason Jar Craft.
- My Little Pumpkin Keepsake Craft.
- Paper Strip Pumpkins.
So if you’re looking for a fun and easy way to decorate your house for Halloween on a budget, the Dollar Store Canvas Jack-O-Lantern Craft is definitely the project for you!
All of the supplies necessary can be found at your local dollar store, so you don’t have to spend a lot of money.
Plus, this craft is perfect for kids because it’s easy for them to do on their own.
So what are you waiting for? Get started on your jack-o-lantern today!

Dollar Store Canvas Jack-O-Lantern Craft
Dollar Store Canvas Jack-O-Lantern Craft

Looking for a fun and easy way to decorate for Halloween? Try this Dollar Store canvas jack-o-lantern craft! It's simple to make and doesn't require any special skills or tools. Plus, you can customize it to fit your own personal style. So gather up some supplies and get started today!
Materials
- Art Canvas, Four – Dollar Store
- Wooden Craft Stick, One – Dollar Store
- Glue Gun and Glue Sticks – Dollar Store
- Twinkle Lights, White – Dollar Store
- Batteries – Dollar Store
- Acrylic Craft Paint – Bright Orange, Medium Orange, Dark Orange
- Scrap of Felt – Olive Green
- Recycled Champagne Cork
- Scrap of Cardboard
- Vellum Paper
- Wired Twine
- JACK-O-LANTERN PATTERNS
Tools
- Craft Knife
- Self-Healing Mat
- Scissors
- Wire Cutters
- Pencil
Instructions
- Basecoat all four art canvases with medium orange acrylic craft paint.
- While still wet, add in strokes of dark orange and light orange acrylic craft paint.
- Blend until you are pleased with the color variations.
- Download and print the JACK-O-LANTERN PATTERNS, and then cut them out with scissors.
- Flip over one canvas and trace the Jack-O-Lantern features with a pencil.
- Place the canvas on a self-healing mat and carefully cut out the Jack-O-Lantern features with a craft knife.
- Basecoat the backside and edges of the four canvases with medium orange acrylic craft paint.
- Trim a wooden craft stick in three pieces with scissors and attach it to the back of the Jack-O-Lantern teeth with a glue gun and glue sticks.
- Attach the canvases together in a rectangle using a glue gun and glue sticks. Gluing a canvas to the right and left side.
- Secure the back canvas to the first three with a glue gun and glue sticks to complete the rectangle.
- Measure and cut a piece of scrap cardboard to fit the bottom of the lantern.
- Basecoat the cardboard with medium orange acrylic craft paint.
- With the orange side up, attach the cardboard to the base of the lantern with a glue gun and glue sticks.
- Download and print the LEAF PATTERN, layer it onto a scrap of olive green craft felt, and cut out two with scissors.
- To create dimension, apply a dot of glue at the base of each leaf and fold it in half.
- Measure and cut two 12” lengths of wired twine using wire cutters.
- Wrap around a pencil, and then slide off to create a vine.
- Stretch and bend the wire to create a pumpkin vine.
- Attach a champagne cork to the front center of the canvas with a glue gun and glue sticks.
- Hold in place until the glue dries completely.
- Glue the wired twine vines and the leaves to the sides of the cork stem.
- Measure and cut a piece of vellum paper 4” by 6” and place it inside
the lantern behind the Jack-O-Lantern features. - Place batteries in a strand of twinkle lights and place them inside the lantern. The vellum gives the lantern a soft glow.
WHAT’S NEXT?
If you get a chance to try it, let us know! Leave us a comment below, or share it with a picture on Instagram or Facebook! Don’t forget to tag us @kelly_reci_ and use the hashtag #Kellysthoughtsonthings so we can see what amazing meals you are cooking up!
Don’t Forget To Come Back And Let Me Know How Your Dollar Store Canvas Jack-O-Lantern Craft Turned Out! Jack-O-Lantern Craft Turned Out!
Terra L Heck
Tuesday 25th of October 2022
I really like that. It's so cute and festive.