
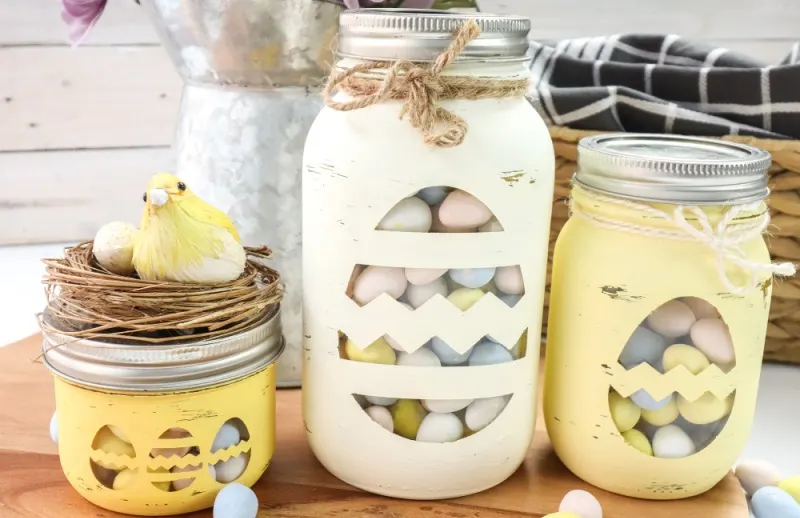
This Easter, make sure to create these two Chalky Painted Easter Candy Jars. Two mason jars are painted with pastel chalk paint in an Easter egg design for decor items for your home.
You can use these beautiful Easter candy jars as decor pieces anywhere in your home.
You can also fill them with candy and leave them on a table, mantel, kitchen counter, etc.


These Easter candy jars also make amazing gifts to give to family and friends throughout spring.
This budget-friendly Easter candy jar is easy to make using a Cricut and some paint. You can find the materials at your local craft store or online.
In about 1 and a half hours, you’ll have two beautiful pastel chalky colored jars with Easter egg designs to fill with candy to decorate your home for Easter!

HOW TO MAKE CHALKY PAINTED EASTER CANDY JARS
Two jars are decorated with chalky paint in an Easter egg design for a cute candy jar decor piece the whole family will enjoy!
Are you ready to get started?
You’ll find the specific material amounts and detailed instructions in the printable craft at the bottom of this post.
TOOLS YOU MAY NEED
Disclosure: This blog post contains affiliate links for products or services we think you’ll like. This means if you make a purchase from one of these links, Kelly’s Thoughts On Things may make a small commission at no additional cost to you. We only recommend items we use and love.
- Cricut Joy
- Scissors
- Weeding Tool (optional)
- Paintbrush
- Hot glue gun and clear glue sticks
- Sandpaper, 200grit
CHALKY PAINTED EASTER CANDY JAR MATERIALS

These beautiful Chalky Painted Easter Candy Jars use easy to find materials to create a festive candy jar your family will love.
All you need is:
- glass jars in assorted sizes with lids
- Easter Egg SVG
- smart vinyl, removable (in any color as it will be discarded, we used silver)
- Cricut transfer tape
- Americana Decor Chalky Finish Chalk Paint in Rejuvenate, Delicate, and Lace
- twine
- decorative bird on a nest
- sandpaper, 200grit
CHALKY PAINTED EASTER CANDY JARS CRAFT INSTRUCTIONS
Thoroughly wash jars with soap and hot water and let them dry completely before using.

On a blank Design Space canvas, upload the Easter Egg SVG file.
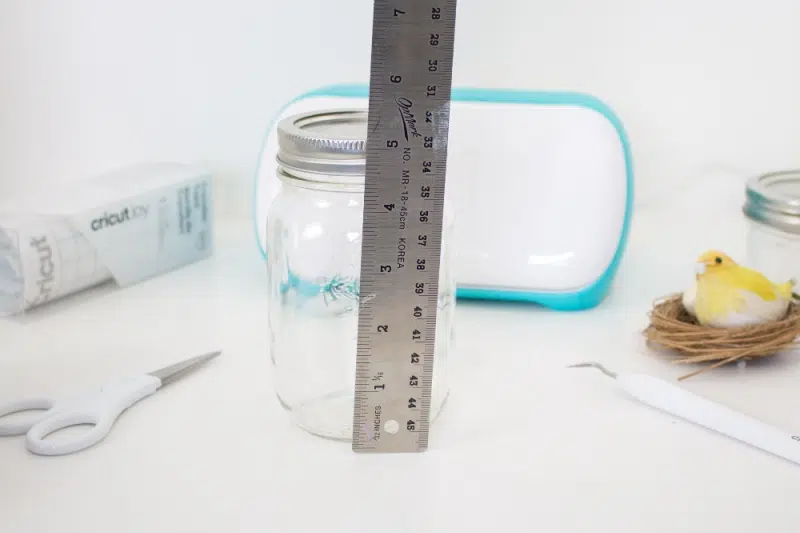
Measure the glass jar and resize the eggs to fit on the jars as needed.

Select “Make It” in Design Space and choose to cut without a mat.
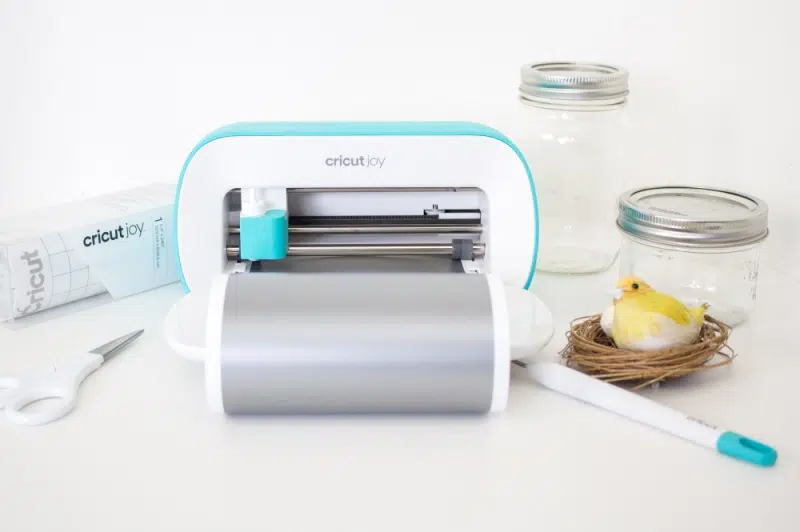
Set material type to Smart Vinyl, Removable.

Follow the prompts for loading the mat into Cricut Joy and cutting the Smart Vinyl.
When the cut is complete, unload the vinyl.

Cut around each egg image with a pair of scissors.

Using the weeding tool or your fingernails, peel away the excess vinyl around the vinyl-cut images and discard them.
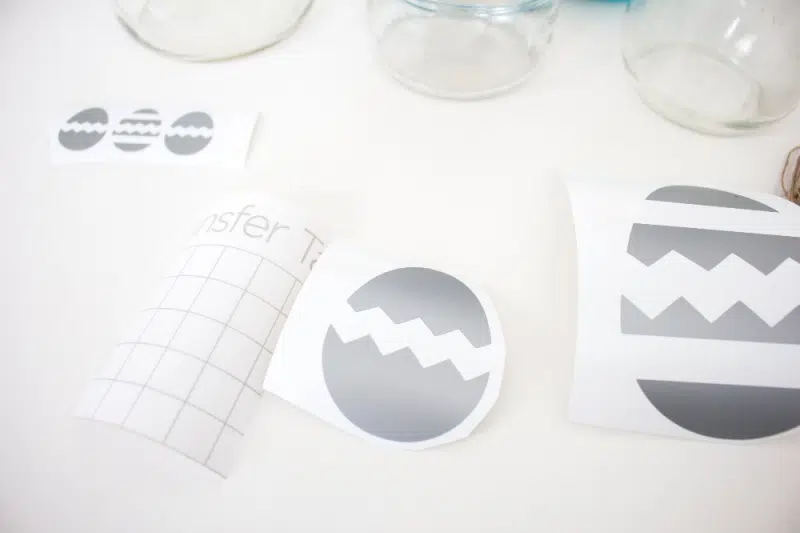
Cut a piece of transfer tape a bit larger than the egg.

Peel away the transfer tape backing and place the transfer tape over the top of the vinyl image.
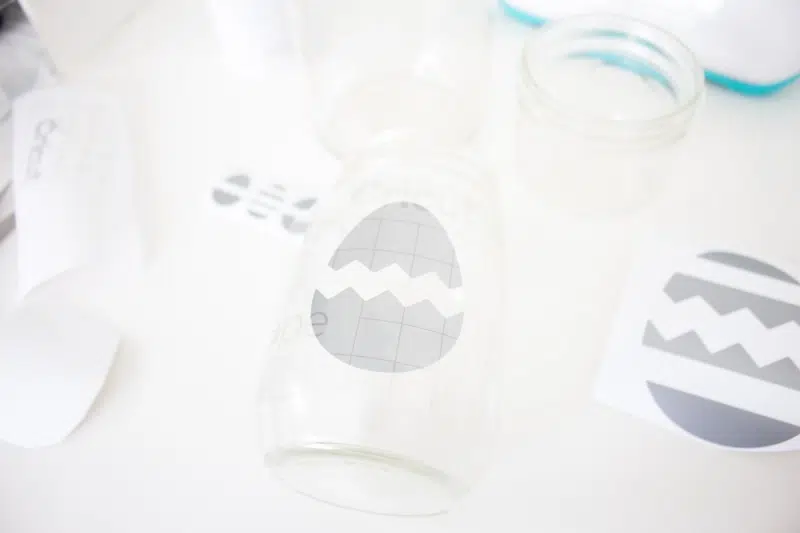
Gently rub the vinyl to help it stick to the transfer tape.
Peel away the backing, leaving the egg adhered to the transfer tape.

Position the egg and transfer tape onto the smooth side of a mason jar and press in place in the middle of the jar.
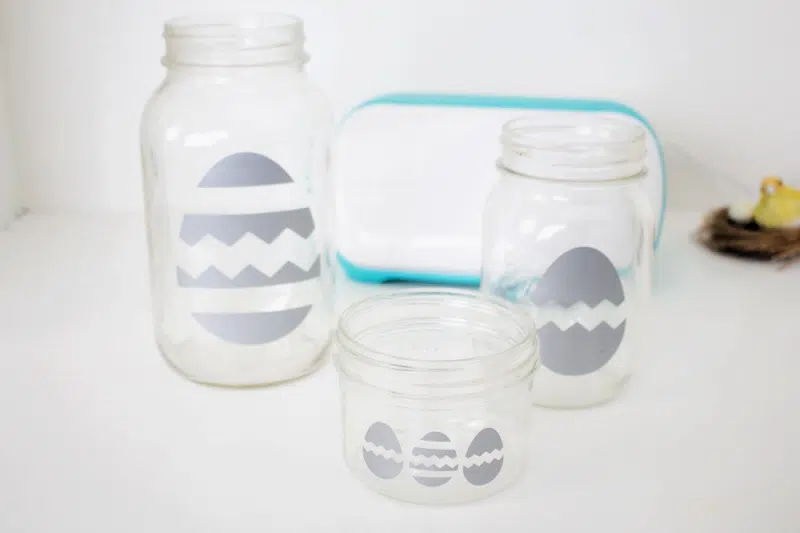
Slowly and carefully remove the transfer tape leaving the vinyl egg design on the jar.
Similarly, position the other eggs onto the remaining glass jars.

Using a medium-sized paintbrush, apply Chalky Finish in Rejuvenate over the surface of the smallest jar including the vinyl eggs.
Allow it to fully dry before applying the second coat of paint.

Paint the medium-sized jar in Delicate and the largest jar in Lace color.
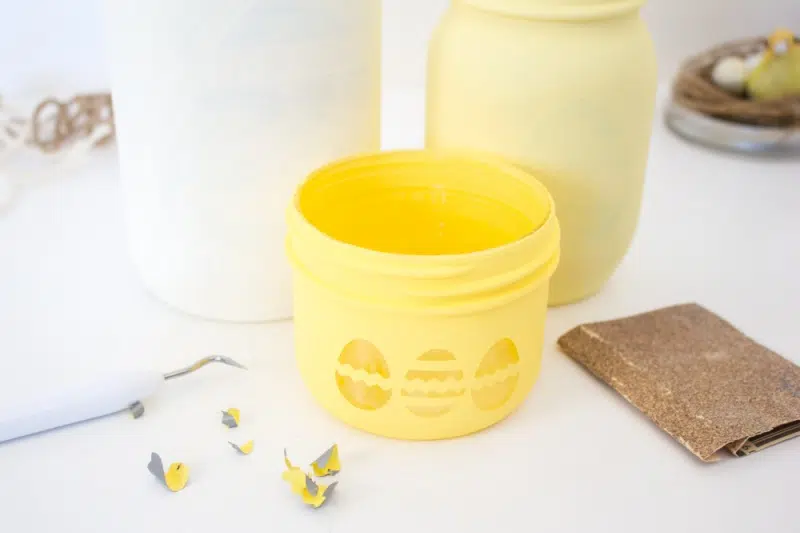
Once dry, use the weeding tool or your fingernails to pick away and peel off the vinyl egg shapes and discard.

Using fine grit sandpaper, gently sand the painted jars to distress the edges.

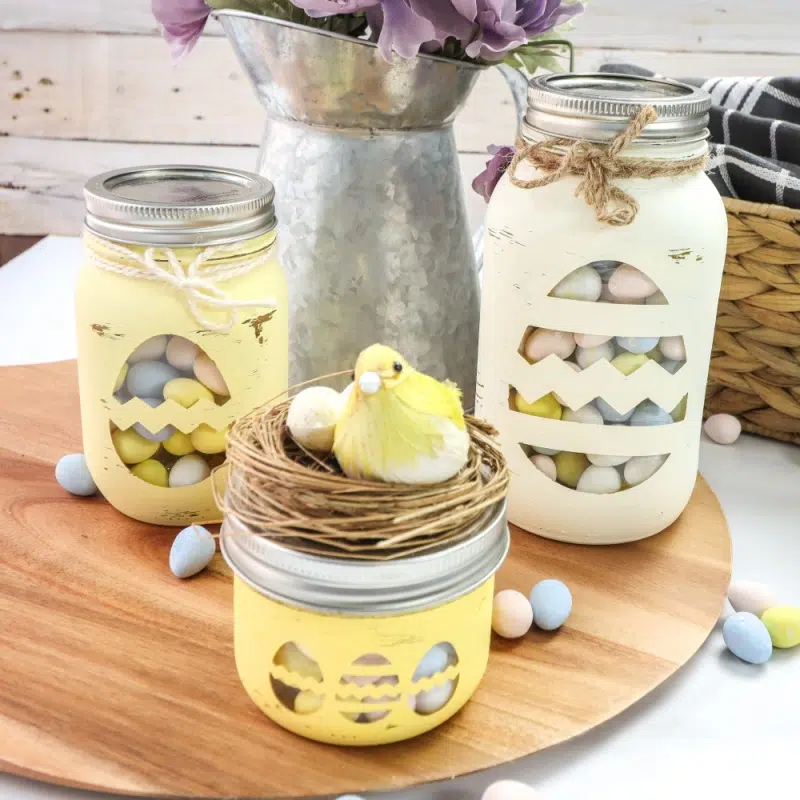
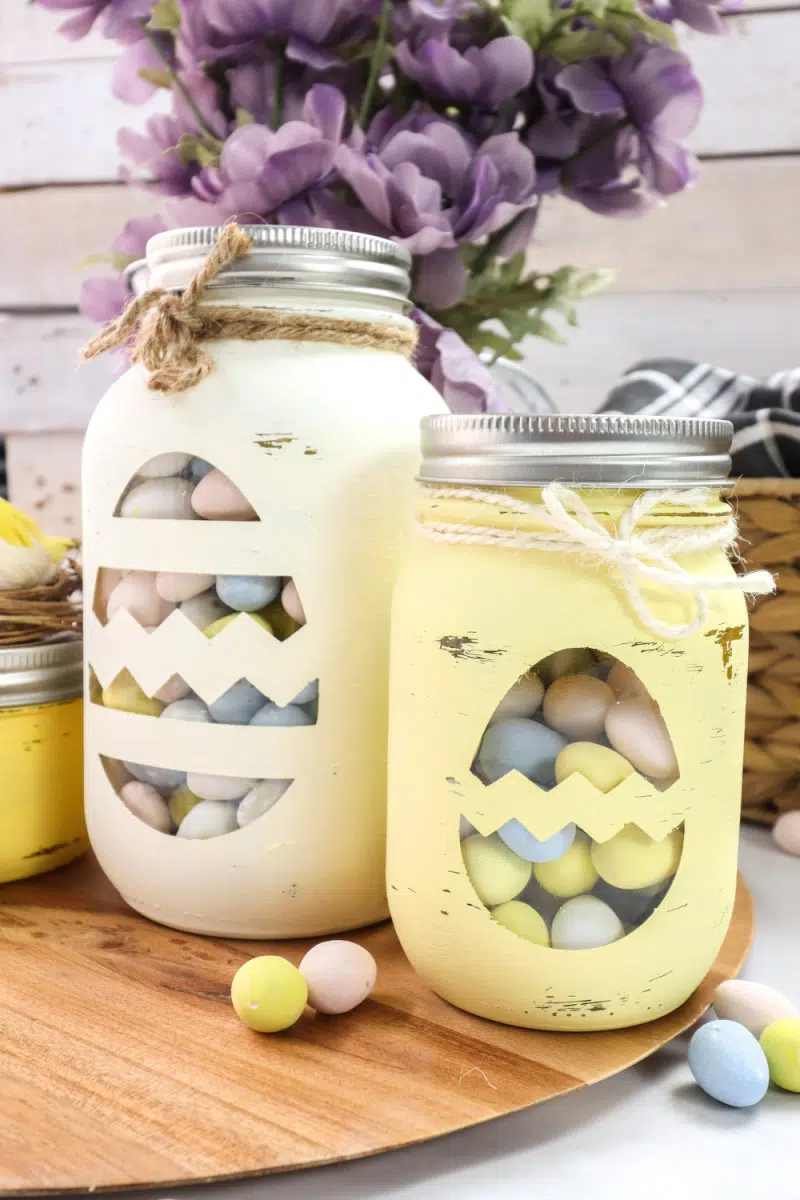
To finish, apply a dab of glue to the top of the jar lid and press a decorative bird’s nest on top and tie a piece of twine around the neck of the jars.

Fill with Easter treats and chocolate eggs.
In about 1 and a half hours, you’ll have two beautiful Easter candy jars that are sure to become a new favorite!
CHALKY PAINTED EASTER CANDY JARS TIPS AND QUESTIONS
If you’ve never painted and decorated mason jars, don’t worry! Below are some common questions and helpful tips.
Hopefully, this will answer any questions you may have. If not, feel free to ask in the comments and I’ll answer the best I can.
HOW LONG DOES IT REALLY TAKE TO MAKE CHALKY PAINTED EASTER CANDY JARS?
This Chalky Painted Easter Candy Jar craft takes approximately 1 hour and 28 minutes. TOTAL.
This includes:
- About 3 minutes to wash and dry the jars
- Close to 5 minutes to upload the SVG file and resize it
- Around 15 minutes to print the vinyl and attach it to the jars
- 1 hour apply the two coats of paint to the jars and remove the vinyl
- 5 minutes to attach the bird’s nest and twine to the jars

CAN I REUSE THESE EASTER MASON CANDY JARS EACH YEAR?
You can reuse these beautiful Easter mason candy jars every year. It will be a great addition to your homemade Easter decor items.
CAN I USE A DIFFERENT COLOR OF PAINT?
You can use any color or type of paint you want. These Easter candy jars will look great in a variety of colors.

CAN I GIVE THIS PAINTED EASTER JAR AS A GIFT?
Yes, you can make this Painted Easter Jar and give it as a gift. Anyone would love a thoughtful homemade candy jar to use for storage or decor.
You could fill the jars with jelly beans, chocolate eggs, etc.
WHAT GOES WELL WITH A CHALKY PAINTED EASTER CANDY JAR?
Chalky Painted Easter Candy Jars go well with a wide variety of DIY Easter decor items. These crafts would look great together.
Some of my personal favorites include:
- DIY Dyed Easter Eggs
- Twine Wrapped Plastic Eggs
- Easter Egg Cocoa Bombs (store them in the jar)
- Easter Basket
- Cadbury Creme Egg Fudge
WHAT ELSE CAN I ADD TO THIS CHALKY PAINTED EASTER CANDY JARS?
These cute Chalky Easter Candy Jars not only looks great, but it’s also incredibly versatile.
Try adding some gold-colored paint to highlight the egg design.


CHALKY PAINTED EASTER CANDY JARS CRAFT
Cricut Chalky Painted Easter Candy Jars Craft
This Easter, make sure to create these two Chalky Painted Easter Candy Jars. Two mason jars are painted with pastel chalk paint in an Easter egg design for decor items for your home.
Materials
- glass jars in assorted sizes with lids
- Easter Egg SVG
- smart vinyl, removable (in any color as it will be discarded, we used silver)
- Cricut transfer tape
- Americana Decor Chalky Finish Chalk Paint in Rejuvenate, Delicate, and Lace
- twine
- decorative bird on a nest
- sandpaper, 200grit
Tools
- Cricut Joy
- Scissors
- Weeding Tool (optional)
- Paintbrush
- Hot glue gun and clear glue sticks
- Sandpaper, 200grit
Instructions
- Thoroughly wash jars with soap and hot water and let them dry completely before using.
- On a blank Design Space canvas, upload the Easter Egg SVG file.
- Measure the glass jar and resize the eggs to fit on the jars as needed.
- We resized the largest to 3.75” high, the medium size to 2.25” high, and the smallest eggs to 1” high.
- Select “Make It” in Design Space and choose to cut without a mat.
- Set material type to Smart Vinyl, Removable.
- Follow prompts for loading mat into Cricut Joy and cutting the Smart Vinyl.
- When the cut is complete, unload the vinyl.
- Cut around each egg image with a pair of scissors.
- Using the weeding tool or your fingernails, peel away the excess vinyl around the vinyl-cut images and discard them. Cut a piece of transfer tape a bit larger than the egg.
- Peel away the transfer tape backing and place the transfer tape over the top of the vinyl image.
- Gently rub the vinyl to help it stick to the transfer tape.
- Peel away the backing, leaving the egg adhered to the transfer tape.
- Position the egg and transfer tape onto the smooth side of a mason jar and press in place in the middle of the jar. Slowly and carefully remove the transfer tape leaving the vinyl egg design on the jar.
- Similarly, position the other eggs onto the remaining glass jars.
- Using a medium-sized paintbrush, apply Chalky Finish in Rejuvenate over the surface of the smallest jar including the vinyl eggs.
- Allow it to fully dry before applying the second coat of paint. Paint the medium-sized jar in Delicate and the largest jar in Lace color.
- Once dry, use the weeding tool or your fingernails to pick away and peel off the vinyl egg shapes and discard.
- Using fine-grit sandpaper, gently sand the painted jars to distress the edges.
- To finish, apply a dab of glue to the top of the jar lid and press a decorative bird’s nest on top and tie a piece of twine around the neck of the jars.
- Fill with Easter treats and chocolate eggs.
WHAT’S NEXT
I hope you enjoy this DIY Easter Jar as much as my family does!
If you get a chance to try it, let us know! Leave us a comment below, or share it with a picture on Instagram or Facebook! Don’t forget to tag us @kelly_reci_ and use the hashtag #Kellysthoughtsonthings so we can see what amazing meals you are cooking up!