
Decorate your front porch with these Spooky Paper Luminaries. They are perfect for Halloween and can be made in minutes. White paper bags are decorated with Halloween images and filled with flameless votives.


These Spooky Paper Luminaries are not only budget-friendly decor pieces but are also extremely easy to make.
This is a fun craft that your children can help you make to decorate your home.
Your children can help draw on the Halloween images and fill each paper bag with the flameless votives.
These Spooky Paper Luminaries will add a special touch anywhere you place them. They can be used outdoors and indoors to add a touch of Halloween.
Use them indoors to decorate your fireplace, shelves, stairs, etc. Use them outdoors to decorate your sidewalk and front porch.
Once it gets dark these simple paper bag luminaries look amazing anywhere you place them.
In less than 15 minutes, you’ll have beautiful paper bags that light up with spooky images for Halloween!

HOW TO MAKE SPOOKY PAPER LUMINARIES
White paper bags are decorated with Halloween images and then filled with flameless votives that light up the bags from within for a spooky decor piece the whole family will enjoy!
Are you ready to get started?
You’ll find the specific material amounts and detailed instructions in the printable craft at the bottom of this post.
TOOLS YOU MAY NEED
Disclosure: This blog post contains affiliate links for products or services we think you’ll like. This means if you make a purchase from one of these links, Kelly’s Thoughts On Things may make a small commission at no additional cost to you. We only recommend items we use and love.
SPOOKY PAPER LUMINARY MATERIALS

These beautiful Spooky Paper Luminaries use easy-to-find materials to create a simple Halloween decoration your family will love. You can easily find the materials at any grocery or craft store.
All you need is:
SPOOKY PAPER LUMINARY CRAFT INSTRUCTIONS

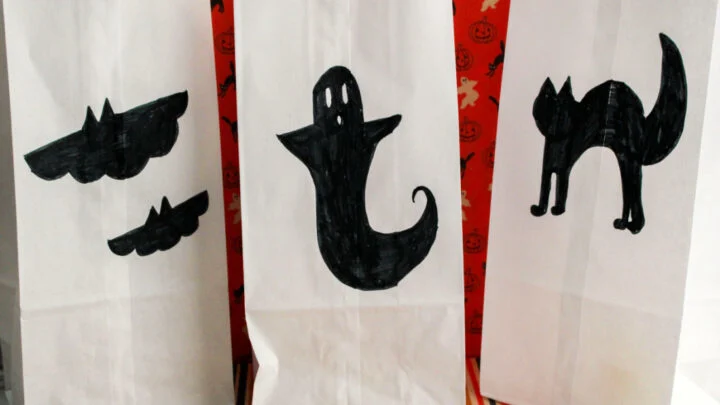
Start by taking a paper bag and a black marker and draw Halloween-themed faces, shapes, or silhouettes on each paper bag.

Open the paper bags and place a flameless votive inside.
Take the spooky paper luminaries and line them up on your sidewalk, hearth, or anywhere that would look great with this simple decoration.
If it is a windy night and the bags will not stay still, simply add sand or rocks to the bottom of the bag around the votive.
In about less than 15 minutes, you’ll have fun spooky paper bags that light up to decorate your home.


SPOOKY PAPER LUMINARY TIPS AND QUESTIONS
If you’ve never made paper bag crafts, don’t worry!
Below are some common questions and helpful tips.
Hopefully, this will answer any questions you may have. If not, feel free to ask in the comments and I’ll answer the best I can.
HOW LONG DOES IT REALLY TAKE TO MAKE SPOOKY PAPER LUMINARIES?
This Spooky Paper Luminary craft takes approximately 13 minutes. TOTAL.
This includes:
- About 10 minutes to draw a few ghost faces on paper bags
- Close to 3 minutes to add flameless votives to each bag

CAN I REUSE THESE SPOOKY PAPER LUMINARIES EACH YEAR?
You can reuse these Spooky Paper Luminaries every year. It will be a great addition to your homemade Halloween decor items.
Carefully store the paper bags in a box so they will not get damaged.
These paper bag crafts are so budget-friendly that you can make new ones every year.
CAN I CUT OUT SHAPES INSTEAD OF DRAWING IMAGES ON THE PAPER BAGS?
Yes, you can use scissors and cut out shapes on the paper bags instead of drawing the shapes with a black marker.
Cutting out shapes would be a great way to show a pattern or make the paper bags look like Jack-O-Lanterns.
CAN I USE ANY COLOR OF PAPER BAG?
You can use any color of a paper bag to make Paper Luminaries.
White paper bags work the best because the light of the flameless candle can effortlessly shine through the bags.
Brown paper bag luminaries will look great too.
If you can’t find white paper bags at your grocery store order them online through places like Amazon.

WHAT IMAGES SHOULD I DRAW ON THE PAPER BAGS?
I suggest drawing Halloween-themed images on the paper bags like whole ghosts, ghost faces, Frankenstein’s face, Jack-O-Lanterns, spiders, etc.
Have fun drawing all your favorite Halloween characters.
These are easy images that you or your children can draw. The images don’t need to be perfect to look great.
WILL THE PAPER LUMINARIES CATCH FIRE?
No, the Paper Luminaries should not catch fire as long as you use flameless votives instead of real candles.
You can also weigh down the paper bags with sand or rocks to prevent them from tipping over.
WHAT GOES WELL WITH SPOOKY PAPER LUMINARIES?
Spooky Paper Luminaries go well with a wide variety of DIY Halloween decor items. These crafts would look great together.
Some of my personal favorites include:
- Ghost Tea Bags
- Skull Vase
- Paper Halloween Clothespins
- Dollar Store Book Pumpkin
- Halloween Laundry Bucket
WHAT ELSE CAN I ADD TO THESE SPOOKY PAPER LUMINARIES?
This fun Spooky Paper Luminaries not only looks great, but it’s also incredibly versatile.
Try adding some glow-in-the-dark stickers to each bag to add some extra fun to each paper bag decoration.

SPOOKY PAPER LUMINARIES CRAFT
Spooky Paper Luminaries

Decorate your front porch with these Spooky Paper Luminaries. They are perfect for Halloween and can be made in minutes. White paper bags are decorated with Halloween images and filled with flameless votives.
Materials
- White paper bags
- Flameless votives
Tools
- Black permanent markers
Instructions
- Start by taking a paper bag and a black marker and draw Halloween-themed faces, shapes, or silhouettes on each paper bag.
- Open the paper bags and place a flameless votive inside.
- Take the spooky paper luminaries and line them up on your sidewalk, hearth, or anywhere that would look great with this simple decoration.
- If it is a windy night and the bags will not stay still, simply add sand or rocks to the bottom of the bag around the votive.
- In about less than 15 minutes, you’ll have fun spooky paper bags that light up to decorate your home.
WHAT’S NEXT
I hope you enjoy this DIY Halloween decor item as much as my family does!