
Entertain your kids for hours with this fun Floating Creepy Crawlies craft. Dry erase markers are used to draw little creatures on a plate, then water is added, and instantly the creatures float to the surface.


This is an easy craft for children to make. Your children will be amazed watching the creatures they drew float off of the plate and onto the water.
They will want to draw them over and over again. This is a great craft to keep your kids entertained.
You can do this craft any time of the year. It’s especially fun to make around Halloween.
Your children will have fun drawing anything they want from insects, animals, to objects and watch them float off the plate as soon as they add a little bit of water. It’s like magic!
This floating dry erase drawing craft is perfect for children of any age.
Younger children can have fun scribbling and older children can draw more advanced creatures.
They’ll all have fun watching the dry erase creatures magically lift off the plate.
This budget-friendly craft is easy to make using dry erase markers and a plate.
That’s all you need plus a little bit of water. You can find the materials at your local craft store or online.
In a few minutes, you’ll have floating creatures that will amaze your children!

HOW TO MAKE FLOATING CREEPY CRAWLIES
Creatures are drawn on a plate and then submerged in water to cause the creatures to float off of the plate for fun craft children will enjoy!
Are you ready to get started?
You’ll find the specific material amounts and detailed instructions in the printable craft at the bottom of this post.
TOOLS YOU MAY NEED
Disclosure: This blog post contains affiliate links for products or services we think you’ll like. This means if you make a purchase from one of these links Kelly’s Thoughts On Things may make a small commission at no additional cost to you. We only recommend items we use and love.
- White Ceramic Plate
FLOATING CREEPY CRAWLIES MATERIALS

This fun dry erase marker craft uses easy-to-find materials to create floating creepy crawly creatures your children will love. All you need is:
- new dry erase markers
- some water
FLOATING CREEPY CRAWLIES CRAFT INSTRUCTIONS

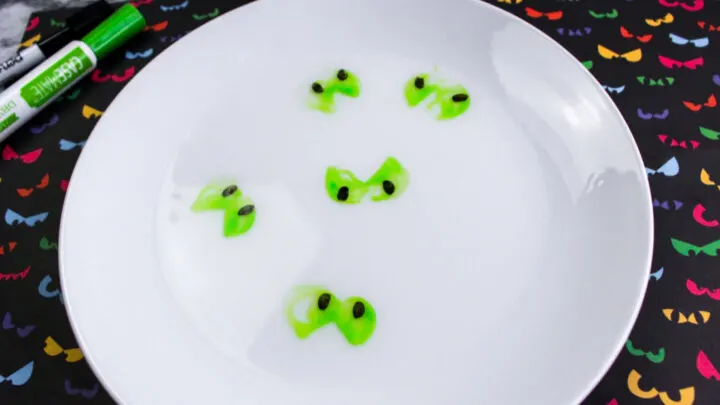
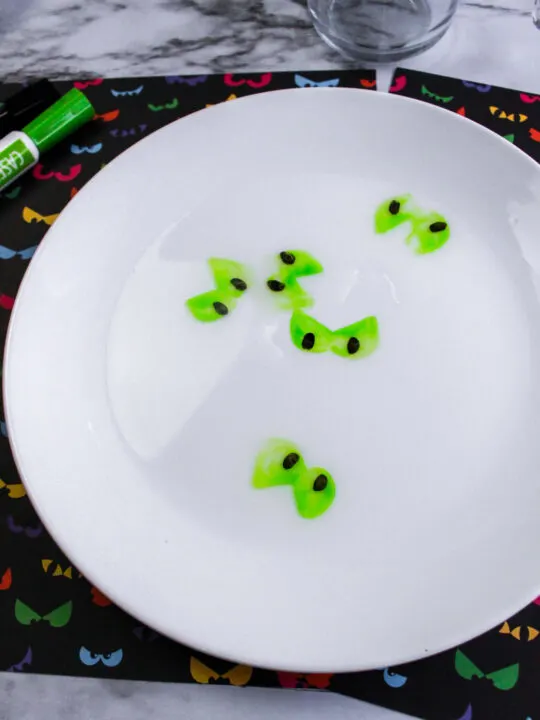
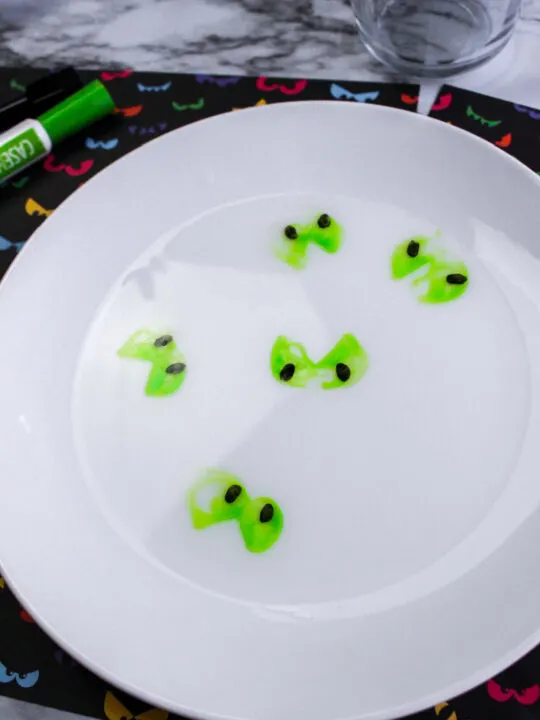
Take a dry ceramic plate and draw some creepy shapes on the plate using a new dry erase marker.
After drawing on the creepy crawlies, to make them float, slowly pour a small amount of water onto the plate.

The shapes should begin to lift when the water touches.
If they do not lift completely, tilt the plate slightly.
In about 4 minutes, you’ll have fun creepy crawlies that are sure to become a new favorite craft!
FLOATING CREEPY CRAWLIES TIPS AND QUESTIONS
If you’ve never made a craft using dry erase markers, don’t worry!
Below are some common questions and helpful tips.
Hopefully, this will answer any questions you may have. If not, feel free to ask in the comments and I’ll answer the best I can.

HOW LONG DOES IT REALLY TAKE TO MAKE FLOATING CREEPY CRAWLIES?
This Floating Creepy Crawlies craft takes approximately 4 minutes. TOTAL. This includes:
- About 3 minutes to draw on the creepy crawlies
- Close to 1 minute to fill with water and watch them float
CAN I USE ANY COLOR OF DRY ERASE MARKERS?
You can use any color of dry-erase markers you want. I suggest only using new dry erase markers.
Those will work the best for this craft.
Have fun creating creatures in a variety of colors like black, purple, green, yellow, pink, etc.
CAN I USE ANY KIND OF PLATE TO DRAW ON?
No, you cannot use any kind of plate to make this craft.
A ceramic plate with an enamel glaze was used in this experiment. Paper plates will not work.
This was not tested on glass or plastic (but that would be a fun variation to try to make the experience more scientific.)
CAN I TRANSFER THE DRAWING TO A PAPER?
Yes, you can transfer the drawing to paper. Simply place the piece of paper over the floating creatures and lift the paper off of the water.
Your creatures should now be stuck to the paper.
CAN I USE A WHITEBOARD MARKER INSTEAD OF A DRY ERASE MARKER?
Yes, you should be able to use a whiteboard marker instead of a dry erase marker to make this craft.
As far as I know, the markers are the same.
WHY DOES DRY ERASE MARKER DRAWINGS FLOAT IN WATER?
Drawings made with dry erase markers float in this craft because the ink is insoluble in water.
The ink will not dissolve in water so it floats.
WHAT CRAFTS GOES WELL WITH FLOATING CREEPY CRAWLIES?
If you enjoyed making Floating Creepy Crawlies you’ll also love these other fun Halloween crafts.
Some of my personal favorites include:
- Ghost Tea Bags
- Mummy Candy Cups
- Cricut Halloween Characters Clothespins
- Witches’ Brew Bath Bombs
- Skull Cookie Mix in a Jar
WHAT ELSE CAN I ADD TO THESE FLOATING CREEPY CRAWLIES?
This fun Floating Creepy Crawlies not only look spooky but are also incredibly versatile.
Try drawing your favorite cartoon characters, insects, and animals.
You can use a variety of colors. Watch them instantly lift off of the plate as soon as you add some water.
FLOATING CREEPY CRAWLIES CRAFT
Floating Creepy Crawlies Craft


Entertain your kids for hours with this fun Floating Creepy Crawlies craft. Dry erase markers are used to draw little creatures on a plate, then water is added, and instantly the creatures float to the surface.
Materials
- Dry erase markers
- White plate
- Water
Instructions
- Draw creepy shapes on the plate using a dry erase marker.
- Slowly pour a small amount of water onto the plate. The shapes should begin to lift when the water touches. If they do not lift completely, tilt the plate slightly.
Notes
● Do not use too much water. If the shape doesn’t lift, try pouring off the water and pouring less.
● Use new dry erase markers.
● Always use a completely dry plate.
● A ceramic plate with an enamel glaze was used in this experiment. Paper plates will not work. This was not tested on glass or plastic (but that would be a fun variation to try to make the experience more scientific.)
● To expand the activity, touch a piece of paper or cotton swab to the floating shapes to see what happens when they touch a dry surface.
● Smaller shapes work best. Larger designs fall apart when they begin to float.
● The entire shape should touch. If dry lines cross the shape, the pieces will lift separately.
WHAT’S NEXT
I hope you enjoy this DIY Halloween craft as much as my family does!